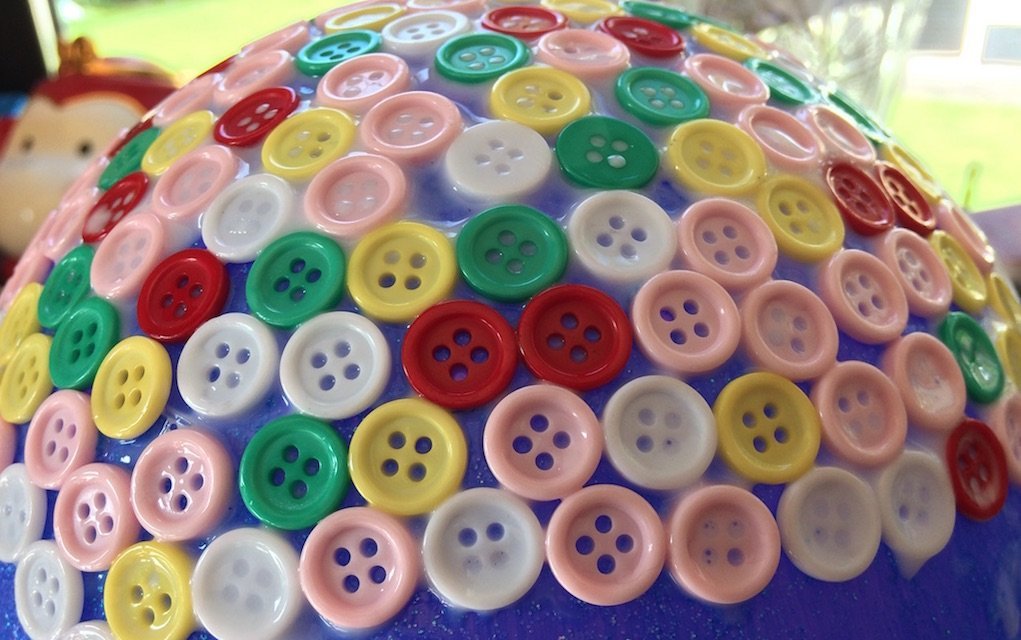
We’re always on the lookout for great craft ideas for kids to make, and this balloon and button bowl is one of our favourites. It looks impressive, but you only need a few basic materials and a little patience while each layer dries. Here’s how to make your own — plus a few fun variations to try once you’ve got the hang of it.
Materials needed for this button craft idea for kids

- A balloon (inflated)
- Flat buttons
- PVA craft glue
- Paintbrush
- Glitter glue (optional)
It’s also a good idea to have some newspaper down to protect your work surface, plus a jug or cup to hold the balloon steady while you work.
You may also enjoy: 10 of the Cutest Fluffiest Cotton Wool Craft Ideas for Kids
How to make your button bowl
- Blow up your balloon and tie the top.
- Place it knot-side down in a jug or glass to keep it steady.
- Add the first coat of glue, roughly covering the area you want your bowl to be (if using glitter or glitter glue, mix this in with your regular PVA glue for this coat). Leave to dry fully.
- Don’t worry about drips — you can trim these away once you pop the balloon!
- Add a second coat of PVA glue and leave to dry.
- Paint on a third coat and add the buttons, starting in the centre at the top of the balloon. Leave to dry.
- Once dry, paint over the buttons with a layer of PVA glue and leave this coat to dry too.
- When everything is completely dry, snip the knot at the top of the balloon to let the air escape slowly.
- You’ll be left with a beautiful button bowl.
- Trim away any excess balloon to neaten the edges.

Other fun craft ideas for kids using a balloon
If buttons aren’t your thing, try mixing glitter or glitter glue into your regular glue before coating the balloon. Apply three coats, letting the glue dry fully between each one. Once it’s completely dry, pop the balloon and you’ll be left with a sparkly glitter bowl.
Or, for your third coat, try covering the balloon with confetti, flat silver, gold or coloured discs, or pieces of string arranged in a fun design. Once these have dried onto the surface, add a final coat of glue over the top for extra protection. Pop the balloon once everything is dry, and you’ll have a pretty, one-of-a-kind bowl.
You may also enjoy: 12 Funky Crafts for Kids Aged 8–12 Years – Tweens

Frequently asked questions
How long does the button bowl take to make?
It’s a quick craft to set up, but each layer of glue needs time to dry fully before you move on to the next step, so plan to spread this project over a day or two rather than doing it all in one sitting.
What size balloon works best?
A standard round balloon works well for a small decorative bowl. A slightly larger balloon will give you a bigger bowl, but it will take a little longer for each coat of glue to dry.
Can I use a different type of glue?
PVA craft glue is recommended because it dries clear and hard, giving the bowl its shape once the balloon is removed. Other glues may not set firmly enough to hold the structure.
What can I do if my bowl feels a bit fragile after popping the balloon?
Add one more thin coat of PVA glue over the entire surface and leave it to dry fully. This will help reinforce the shape.
You might also like
- 10 of the Cutest Fluffiest Cotton Wool Craft Ideas for Kids
- 12 Funky Crafts for Kids Aged 8–12 Years – Tweens
Have you tried this craft with your kids? We’d love to hear how it turned out — share your results and any variations you tried in the comments below.
Want more craft ideas like this?
Browse our other rainy-day activities and craft ideas for more simple, screen-free ways to keep the kids entertained.
Don’t miss our next round-up of ideas. Sign up for our free newsletter for fresh craft ideas, activities, competitions and offers delivered straight to your inbox — it’s free, and you can unsubscribe any time.